


I've been playing with pizza doughs for a while, actually ever since I found Daiya Cheese. I've read articles, tried recipes and, finally, came up with something that I'm very pleased with. A crispy, chewy crust with good taste, that's easy to work with and relatively simple to make.
I ended up using two kinds of flour. Bread flour has a higher gluten content. It contributes a better crust and more interesting crumb, but it's more elastic and harder to from. It tends to spring back and when you roll out the dough. So I soaked the dough with water and a tiny amount of yeast (called a poolish) overnight to help develop the gluten and to improve the flavor. The next day, I added all purpose flour, which is softer and more workable. The result was a surprisingly workable dough that tasted delicious.
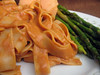
Olive, Artichoke, Tofu Feta, & Daiya Cheese: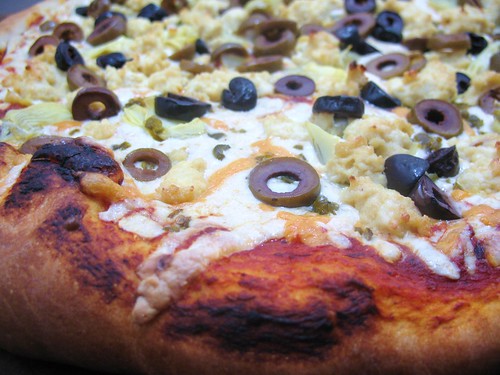
Spinach, Mushroom, Pumpkin & Daiya Cheese:

The night before (Poolish):
2.5 cups bread flour
1.5 cups water
1/4 tsp rapid rise yeast
Mix all the ingredients together and stir until the flour is fully hydrated. This will look more like a thick batter than dough. Cover the bowl with plastic (I use a grocery bag) and leave on the counter for 3 or 4 hours, until the dough has doubled and air bubbles begin to form. Leave covered and refrigerate until needed, up to three days.
The next day:
1 1/2 cups all purpose flour
1 1/2 tsp rapid rise yeast (see note)
1 1/2 tsp salt
2 tbs olive oil
2 - 4 tbs warm cup water
Three hours before you want to add toppings, remove the poolish from the refrigerator. Leave on the counter for an hour or more, to take the chill off the dough. mix together the all purpose flour, yeast and salt and stir into the poolish and oil. Stir vigorously, adding the water, a tablespoon at a time, until all the flour is incorporated and you have a tacky, slightly sticky dough. I use a stand mixer for this step.
Remove from the bowl and drop onto a counter top, dusted with flour. The dough will tacky and slightly sticky. Knead for 10 minutes, dusting with flour as needed, until you have a supple dough. When done, you should be able tear off a chunk of dough and stretch it so the dough becomes translucent when held to the light (illustration here). Coat a bowl with oil and place the dough into the bowl and cover. Leave on the counter top for a couple hours, until the dough has doubled in size.
This dough is wetter than a standard bread dough and will have a slight tendency to your stick to your hands and the counter top when kneading. It shouldn't be overwhelming, though, so dust with additional flour if it is too sticky. And it is easier to add flour while kneading than water, so I err on the side of too much water, then add flour, if necessary.
Form the Dough:
Preheat the oven to 500 degrees, leave the pizza stones or baking pan in the oven to preheat as well.
Split the dough into two equal balls. For each ball, flatten out into a eight (or so) inch circle, pressing from the center toward the edges with your fingers. Then work your way around the dough, gently lifting and stretching as you go. If you have any thin spots, just press dough from the surrounding area into the weak spot. Finally, press the edges out until you've achieved the desired dimension. I think I use 12 inch pizza stones.
Tear off a piece of parchment paper and lay next to the dough. Gently lift the dough off the counter and onto the parchment paper. As necessary, reform the dough into a circle. Let the dough rest for a few minutes. I let it rest while I'm making the other crust.
You can transfer the crust now, or after the toppings are added in one of several ways. The easiest would be a peel, but I don't have one. You can also use a large cutting board in a similar manner. Or, you can use my method, which works very well. Call in a helper. Each of you grab two corners of the parchment paper. Stretching the parchment paper so it remains taunt, lift and unison, and transfer to the new location.
And finally, cook the pizza:
Add the toppings to the pizza. I highly recommend Daiya Cheese vegan cheese (in the photos above), if you can get it. I have never used other brands, but I know that Daiya melts amazingly well. I use 1 1/2 cups (about 1/2 lb) for each pizza. Also, I have a tendency to overload the pizza with toppings, if you share this tendency, fight it, as I must. If you do want many toppings, use fewer of them.
Open the oven and slide out the rack with the preheated stone or baking sheet. Transfer the pizza using one of the methods described above. Do the same with the second pizza on the second rack (or cook separately). Close the oven and bake at 475 degrees until the crust is golden brown, lifting the bottom to make sure it is also done. The parchment paper will have become quite brown and appear charred in places. This is normal and perfectly OK. Just discard when done.
The cooked pizza will slide easily off the parchment paper. You will never have to wash a pizza stone again.
Khaman (Besan) Dhokla
4 hours ago
I have never thought of pumpkin on a pizza, but it looks great! thanks for all the great tips too
Yummy.....I m crazy about pizza. Thanks for sharing the recipe. I will surely try this out.
Take the Pizza Personality Test and find out which kind of Pizza best reflects your personality. I have enjoyed a lot while taking the test. Hope u too will enjoy it. Have Fun!!
Wow. What a great post. I'm excited to try this out this weekend. Thanks for all the info!
oooh, glad I found your blog! now if only I could find Daiya, I can't seem to track out down anywhere!
I wish I had Daiya too... looks like you've been working hard on that dough recipe- always interested in making a better pizza dough!
Your post is proof that rules are made to be broken- I would never have dared to use bread flour because it is supposed to be such a no-no for a good pizza crust, and here you made it work. Will try this for the next pizza project!